Monday, June 30, 2014

Orecchiette with squash sauce and spinach balls - quick, nutritious and delicious

Orecchiette with squash sauce and spinach balls / Orecchiette com molho de abóbora e bolinhas de espinafre

Despite my desire to try new things in the kitchen, I feel very lucky for not having serious food allergies and also for not having to give up gluten or dairy – I was a vegetarian for many years and that wasn’t hard, but I don’t think I would last one week without bread or cheese.

Pasta is another staple I’m not willing to eliminate from my diet, not only because it is delicious but also because it is a very versatile ingredient: it can be made in so many different ways, the sky is the limit. When I’m in a hurry to make dinner or the refrigerator is empty pasta always saves the night. That is why I was so eager to buy Antonio Carluccio’s book on the subject and he didn’t disappoint: it is oh, so beautiful, and the recipes look mouthwatering – I want to cook everything from that book.

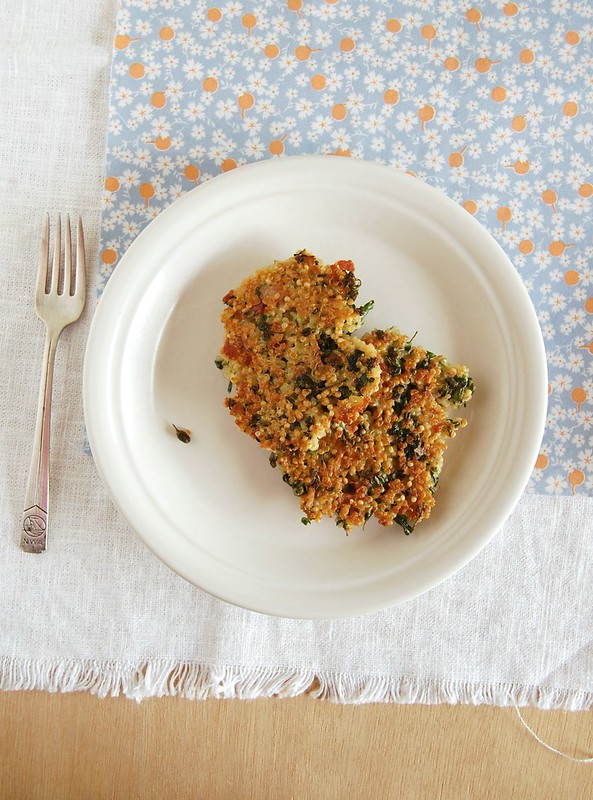
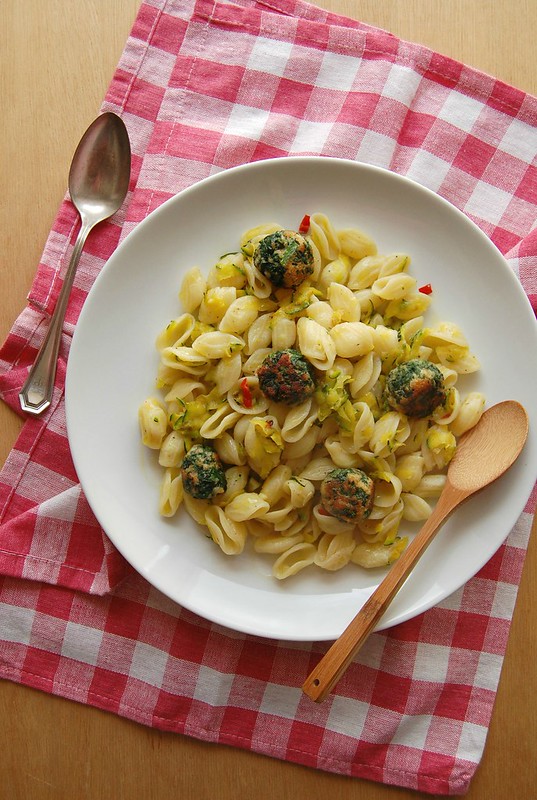
Still strong with the plan of adding more vegetables to our meals and reducing the amount of meat I thought that a pasta dish with a vegetable sauce would make a light, nutritious lunch, and since my husband had said something about how great the dish on the cover of the book looked it was easy to choose a recipe. Carluccio’s recipe calls for zucchini, but I decided to use the beautiful squash I had in my fridge: not only the food was delish and super fresh, it was really quick to put together – that way I did not miss any of the action on the Holland vs Mexico match (I screamed so hard when Sneijder scored that my throat was sore for the rest of the day). :)

Orecchiette with squash sauce and spinach balls
slightly adapted from the beautiful and delicious Pasta: The Essential New Collection from the Master of Italian Cookery

Spinach balls:
150g spinach leaves
1 small garlic clove, peeled and crushed
pinch of freshly grated nutmeg
20g fresh breadcrumbs
15g parmesan cheese, finely grated
1 egg, lightly beaten with a fork
salt and freshly ground black pepper
canola oil, for shallow frying

Pasta and sauce:
150g orecchiette or penne
1 tablespoon olive oil
1 garlic clove, peeled and finely chopped
½ fresh red chilli, not too hot, finely chopped
300g coarsely grated squash*
salt and freshly ground blackpepper, to taste
finely ground parmesan, to serve

Preheat the oven to 120°C/250°F.
Prepare the spinach balls first by cooking the spinach leaves in salted water for a few minutes. Scoop out and leave to cool. When cool, squeeze out most of the moisture and chop the leaves with a knife, but not too small. Then mix in a bowl with the garlic, nutmeg, breadcrumbs and Parmesan. Add the egg gradually, mixing until the mixture comes together (you might not need the whole egg). Season with salt and pepper. Roll mixture into balls (you’ll get about 10) and shallow-fry in a tiny bit of canola oil until they brown on all sides. Keep them warm in the oven while you make the rest of the recipe.

Cook the pasta in plenty of boiling salted water until al dente.
Meanwhile, make the sauce: heat the oil in a large saucepan, and add the garlic, chilli and squash to the pan. Cook quickly in the oil, about 3-4 minutes. Add salt and pepper to taste. Drain the pasta and mix it with the sauce over high heat, to cover and warm everything up, then divide between warmed plates. Drizzle with extra-virgin olive oil, sprinkle with parmesan and place four or five spinach balls on top. Serve at once.

* I used a type of squash called “abóbora paulista”, which by photo I found similar to cushaw squash (but a lot smaller in size); feel free to replace it with other types of squash or use zucchini instead (as called for in the original recipe)

Serves 2

Saturday, June 28, 2014

Little passion fruit and coconut cakes (with amaranth flour) and time to change

Little passion fruit and coconut cakes (with amaranth flour) / Bolinhos de maracujá e coco (com farinha de amaranto)

A very dear friend of mine adores Downton Abbey and every time we see each other she asks me if I have started watching the show, to which I always reply “no, not yet”. She ended up lending me the DVDs, but I’ve been so caught up with SoA that I never bring myself to watch them.

To make things worse, I’ve started watching The Sopranos (because of another dear friend) and got hooked right from the start – it is impossible not to love Tony Soprano, I can tell you.

Breaking Bad, The Fall, SoA and now The Sopranos – I wonder if I’m on a criminal roll. :S Maybe it’s time to change to something less bloody, more delicate. Maybe it’s time for Downton Abbey, after all. :)

If my TV series choices seem to fall into a certain category, my cooking and baking habits seem to have widen, a little at least: these small cakes fit perfectly into my desire to try new things and to make old favorites differently – made with icing sugar, egg whites and almond meal they’re like financiers, but here the all purpose flour is replaced by amaranth flour, making these a tiny bit more nutritional then traditional financiers and also gluten free (I have gone as far as calling sweets “nutritional”, you’re not reading it wrong). :D

Little passion fruit and coconut cakes (with amaranth flour)
slightly adapted from the beautiful Supergrains: Cook Your Way to Great Health

200g pure icing sugar
65g amaranth flour
½ teaspoon baking powder
pinch of salt
1 cup (100g) almond meal
½ cup (50g) desiccated coconut
6 egg whites, lightly whisked
100g unsalted butter, melted and cooled
finely grated zest of 1 lemon
70g passion fruit pulp, seeds and all
1 teaspoon vanilla extract
icing sugar, extra, to serve

Preheat the oven to 180°C/350°F. Butter a 12-hole 80ml muffin pan or line it with paper cases.
Sift the icing sugar, amaranth flour, baking powder and salt together into a large mixing bowl. Stir through the almond meal and coconut.
Add the egg whites, butter, zest, passion fruit pulp and vanilla and stir to combine. Divide the mixture among the lined muffin holes. Bake for 20 minutes or until golden and cooked through (a skewer inserted into the center of a cake should come out with a few moist crumbs clinging to it). Remove from the oven and set aside for 5 minutes, then carefully unmold and transfer to a wire rack to cool.
Dust with icing sugar to serve.

Makes 12

Thursday, June 26, 2014

Chocolate self-saucing pudding - perfect to go with a soccer game

Chocolate self-saucing pudding / Bolo-pudim de chocolate

Warm desserts are something I crave even in hot days (I’m crazy, I know), and if I don’t make them when I have other things going on in the oven I think of them every time I sit on my couch to watch a movie or a TV show (there days those have been replaced by soccer games, actually). :)

I am not a chocoholic and will choose a fruit based dessert over chocolate any day, but while going through one of my old Donna Hay magazine issues searching for inspiration I saw these really pretty chocolate pots and having tried self-saucing puddings before (including chocolate ones) I could not resist them – to the kitchen I went to make these, especially for the Germany vs Ghana game. It is an easy recipe, quick to put together and that needs little over 10 minutes in the oven. Next time I want to give it a try using almond milk.

A really good match and a delicious dessert to go with it – what else could I ask for on a Saturday afternoon? ;)

Chocolate self-saucing pudding
from the always wonderful DH magazine

100g all purpose flour
¾ teaspoon baking powder
pinch of salt
2 tablespoons cocoa powder
45g brown sugar
½ cup (120ml) whole milk, room temperature
35g unsalted butter, melted and cooled
1 egg
1 teaspoon vanilla extract

Sauce:
90g brown sugar
2 tablespoons cocoa powder
1 cup (240ml) boiling water

Preheat oven to 180°C/350°F. Place flour, baking powder, salt, cocoa, brown sugar, milk, butter, egg and vanilla in a medium bowl and whisk to combine. Divide the batter among four 1-cup capacity ovenproof bowls or cups and place them on a baking sheet.
Sauce: combine the brown sugar and coco in a small bowl and sprinkle over the puddings. Top each pudding with ¼ cup (60ml) boiling water. Bake for 12-15 minutes or until the top is firm, like a cake (the sauce will be underneath). Serve right away.

Serves 4

Wednesday, June 25, 2014

Beef, lemon and pecorino meatballs and favorite TV characters

Beef, lemon and pecorino meatballs / Almôndegas com limão siciliano e pecorino

As I finished watching season 5 of Sons of Anarchy, I started thinking about favorite characters in TV series – I have some favorites myself, characters I supported and cheered for (or still do) even if they’re not the nicest people around (hello, Walter White). :)

When it comes to SoA, for instance, it is agonizing to have a favorite character – let’s just say that Kurt Sutter and George R. R. Martin could easily be best friends – but even so Chibs is the one I like the most, I just adore him and his accent. <3 Samantha Jones and Peggy Olson are my favorites in SATC and Mad Men, respectively, and although everyone in Seinfeld was really funny George Costanza was and will always be my #1. :)


Do you have favorite TV characters? I would love to hear about it.


I have favorites when it comes to food, too: meatballs have a very special place in my heart, and the hubby loves them too. I am always interested in trying new meatball recipes, especially ones with a twist like Ottolenghi’s leek meatballs I made the other day. The ones I bring you today are delish, very easy to make, and here the cheese acts both as seasoning and binding agent – no need to add breadcrumbs and eggs. I served them with tomato sauce and Andrew Carmellini’s polenta because it was a very cold day, but I am sure the meatballs would be great as a snack with a bit of Tabasco and a glass of very cold beer on a summer day.

A bit of a warning, though: all that cheese melting in the oven will smell so good you’ll want to dive in as soon as the meatballs are ready – trust me on that. :)

Beef, lemon and pecorino meatballs
slightly adapted from the delicious Olive magazine

400g beef mince
½ red onion, grated
1 garlic clove, minced
finely grated zest of ½ lemon
handful fresh oregano leaves, chopped
30g finely grated pecorino
salt and freshly ground black pepper – I used ½ teaspoon of salt, be careful because pecorino is already salty

Preheat the oven to 200°C/400°F. Line a large baking sheet with a double layer of foil. Brush the foil with vegetable oil.
Place the beef, onion, garlic, zest, oregano, pecorino, salt and pepper in a large bowl and mix to combine (I prefer to use my hand to do that). Shape mixture into balls (the job becomes easier if you lightly wet the palms of your hands). Place the meatballs onto the prepared sheet and bake until golden and cooked through (about 20 minutes).
Serve with tomato sauce or whatever strikes your fancy. :)

Makes about 18

Monday, June 23, 2014

Orange olive oil pound cake and trying new things

Orange olive oil pound cake / Bolo de azeite de oliva e laranja

From time to time I catch myself trying to be more creative in the kitchen, trying to use different kinds of flour, for instance, or to use more vegetables and less meat. Lately it has been a little less temporary than it used to be, I’ve been thinking of incorporating healthier food in between my cakes and cookies, or at least try new ways of making good old favorites, even if for flavor only. Don’t know the reason why it happened, but I hope I manage to succeed.

I’ve been browsing many blogs and there’s so much out there to be tried and tasted, like the beautiful chocolate cake I saw this morning. There are so many ways of preparing the food I love, it’s a shame not to try them, even if in the end I settle for the old school ways I will be happy to have tried something new.

Amidst so much information, I ended up reaching for a very reliable source, someone whose recipes always turn delicious and I can bake with my eyes closed: Alice Medrich. Her olive oil pound cake sounded so good, I loved the idea of using olive oil instead of butter – I know it’s nothing new but it’s something I seldom do, I usually rely heavily on butter.

To make the cake even moister, I replaced some of the all purpose flour with almond meal and added the zest of 1 orange because orange cakes are really out of this world – this is no exception.

Orange olive oil pound cake
slightly adapted from Sinfully Easy Delicious Desserts

170g unbleached all-purpose flour
1 teaspoon baking powder
30g almond meal
1 cup (200g) granulated sugar
finely grated zest of 1 large orange
1/8 teaspoon table salt
½ cup (120ml) flavorful extra virgin olive oil
½ teaspoon pure vanilla extract
3 small eggs, cold
½ cup (120ml) whole milk, room temperature

Preheat the oven to 180°C/350°F. Lightly butter a 20x10cm (8x4in) loaf pan, line it with baking paper and butter the paper as well.
Sift the flour and baking powder together, stir in the almond meal and set aside.
In the bowl of an electric mixer, mix the sugar and orange zest and rub them together with your fingertips until the sugar is fragrant. Add the salt, oil, and vanilla and, using the whisk attachment, whisk until well blended. Add the eggs, one at a time, beating well after each addition, then continue to beat until the mixture is thick and pale, 3-5 minutes. Scrape the sides of the bowl occasionally. On low speed, beat in the dry ingredients in three additions, alternating with the milk (start and end with the dry ingredients).
Transfer the batter to the prepared pan. Bake for 1 hour or until golden and risen and a cake tester inserted in the center of the cake comes out clean. Cool in the pan on a rack for about 15 minutes, then carefully unmold onto the rack and cool completely. Remove the cake when the cake is cool.

Serves 6-8

Friday, June 20, 2014

Madeleines with lemon curd

Madeleines with lemon curd / Madeleines com curd de limão siciliano

I love baking but admit that turning the oven on in the winter is much more pleasant than doing so on hot days (though that doesn't really stop me). :)

To me, certain baked goods have a summery feel: I look at them and it feels like the sun is shining, even though it's raining and cold outside (as it is right now here in Sao Paulo). As I type this text with nearly frozen fingertips and a cup of piping hot tea by my side, I look at these lovely madeleines and think of a sunny day, I think of spring and flowers, while I plan on making soup for dinner because of the weather.

I might bake another batch of these madeleines before I start chopping leeks, potatoes and carrots for the soup - I know how good it feels every time I take something beautiful and delicious from the oven, it is an instant mood booster. I might even make some savory madeleines to go with the soup - now that's a tough decision, so enjoy the sweet version while I think it through. :)

Madeleines with lemon curd
adapted from the beautiful The Little Paris Kitchen: 120 Simple But Classic French Recipes and the always delicious Gourmet Traveller

80g unsalted butter
finely grated zest of 1 lemon
65g granulated sugar
½ tablespoon light brown sugar
2 eggs, room temperature
½ tablespoon mild honey
1 teaspoon vanilla extract
115g all purpose flour
½ teaspoon baking powder
pinch of salt
18 frozen raspberries, unthawed
about 2 tablespoons lemon curd, in a piping bag
melted butter, extra, for brushing the molds

Melt butter in a saucepan over low heat, add lemon zest and set aside until cooled to room temperature but still liquid (2-3 minutes).
Place the granulated sugar, brown sugar, eggs, honey and vanilla extract in the bowl of an electric mixer and beat until light and fluffy (4-5 minutes). Sift over flour, baking powder and salt and fold through.
Fold in butter mixture a little at a time until just incorporated, cover with plastic wrap and refrigerate (4 hours or up to overnight).
Preheat oven to 200°C/400°F. Brush eighteen 2-tablespoon capacity madeleine molds with melted butter and refrigerate for 10 minutes. Brush the molds again and refrigerate for another 10 minutes. Divide the mixture between the molds (do not spread it out) and press a raspberry deep into the batter. Bake until golden and cooked through (8-10 minutes), then immediately unmold onto a wire rack. While the madeleines are still hot, pop the piping nozzle into the hole of each raspberry and squirt in bit of lemon curd.
Serve warm or at room temperature.

Makes 18

Wednesday, June 18, 2014

Spicy pecorino cookies - another great recipe for entertaining

Spicy pecorino cookies / Biscoitos apimentados de pecorino

The panna cotta I posted the other day is a good recipe for entertaining, but it’s not the only one: I like to serve canapés or small bites so my guests don’t starve while the pizzas are in the oven (or don’t get dizzy from the drinks). :)

These savory cookies are delicious and can be made ahead – in fact, you can keep the dough log in the freezer for up to 1 month and slice and bake the cookies whenever you want. I used pecorino because I love its sharp and strong flavor, but parmesan is a good replacement here (it is the cheese used in the original recipe). The poppy seeds add a nice crunchy texture, and as much as I love that next time I make these cookies I’ll omit them: they’re likely to get stuck in people’s teeth, and that’s not an elegant thing to do to guests. ;)

Spicy pecorino cookies
slightly adapted from the oh, so beautiful Seasonal Baking

85g finely grated pecorino (if using a milder cheese, add a pinch of salt to the recipe)
85g all purpose flour
2 pinches cayenne pepper, or to taste
80g unsalted butter, chilled and chopped
1 tablespoon olive oil
1 tablespoon poppy seeds

In a large bowl, mix the pecorino, flour and cayenne. Mix in the butter and olive oil and, with your fingertips, gently work everything together. If it is too crumbly, add a drop more olive oil. Place the dough on a piece of parchment paper. Fold parchment over dough; using a ruler, roll and press into a log – like Martha does here. Sprinkle the log all around with the poppy seeds, making sure they stick to it. Wrap in parchment. Refrigerate for 2 hours or until very firm.

Preheat the oven to 180°C/350°F. Line a large baking sheet with baking paper.
Cut the log into thin slices and place 2.5cm (1in) apart on the sheet. Bake for 10– 15 minutes or until golden around the edges. Cool in the sheets.

Makes about 30

Monday, June 16, 2014

Scandinavian cardamom cake with Frangelico glaze and the World Cup

Scandinavian cardamom cake with Frangelico glaze / Bolo escandinavo de cardamomo com glacê de Frangelico

The 2014 World Cup has begun and apparently it is already a hit. :)

I have been able to watch a couple of matches so far (but not as many as I would have liked to), Italy vs. England being my favorite up to this moment. I thought Argentina was going to crush Bosnia and Herzegovina, but the 2x1 score wasn’t fair: the Argentinian team wasn’t all that good, a draw would have been a better reflect of what the game really was.

There are people from all around the world walking the streets of my country as I type, and I hope they have a lovely time here. Because of the multicultural days we’ve been having, I bring you a multicultural recipe: a Scandinavian cake – packed with cardamom and cinnamon, obviously – with a Frangelico glaze, a nod to my Italian heritage, even though I feel my German blood a lot stronger most of the time, like this morning, when I saw this. :D

Scandinavian cardamom cake with Frangelico glaze
cake slightly adapted from the delicious World Class Cakes: 250 Classic Recipes from Boston Cream Pie to Madeleines and Muffins

Cake:
½ cup (113g/1 stick) unsalted butter, softened
1 cup (200g) granulated sugar
3 eggs
1 teaspoon vanilla extract
2 ¼ cups (315g) all purpose flour
1 teaspoon baking soda
pinch of salt
2 teaspoons freshly ground cardamom (if using pre -round cardamom that amount might be too much)
½ teaspoon ground cinnamon
½ cup (120ml) sour cream*

Glaze:
100g icing sugar
½ tablespoon Frangelico
1 tablespoon whole milk (more if necessary)

Preheat the oven to 180°C/350°F. Butter a 9-cup capacity Bundt pan (I used a 10-cup capacity pan).
In a medium bowl, sift together the flour, baking soda, salt, cardamom and cinnamon.
Using an electric mixer, cream butter and sugar until light and fluffy. Beat in the eggs, one at a time, and scrape the sides of the bowl after each addition. Beat in the vanilla.
On low speed, beat in the dry ingredients in three additions, alternating with the sour cream (start and end with the dry ingredients). Transfer the batter to the prepared pan and smooth the surface. Bake for about 45 minutes or until risen and golden and a skewer inserted in the center comes out clean. Cool in the pan over a wire rack for 20 minutes, then carefully unmold onto the rack and cool completely.

Glaze: sift the icing sugar into a small bowl. Add the Frangelico e 1 tablespoon of the milk, stir until you get a drizzable consistency (add more milk if necessary). Drizzle over cooled cake. Set aside for 15 minutes.

* homemade sour cream: to make 1 cup of sour cream, mix 1 cup (240ml) heavy cream with 2-3 teaspoons lemon juice in a bowl. Whisk until it starts to thicken. Cover with plastic wrap and leave at room temperature for 1 hour or until thicker (I usually leave mine on the counter overnight – except on very warm nights – and it turns out thick and silky in the following morning; refrigerate for a creamier texture)

Serves 10-12

Friday, June 13, 2014

Lemon marmalade bars and a crazy teaser trailer

Lemon marmalade bars / Barrinhas de geleia de limão siciliano

While going through the links saved on my Delicious last week searching for much needed inspiration, I saw these lemon bars I’d seen weeks before – even though they’re probably my favorite baked good, lemon bars are nothing new to me, I have made them in several different ways so far.

These, however, got me really curious because the whole lemon – zest, pulp, white pith and all – gets chopped and macerated in sugar before being blitzed into a sort of jam. The thought of it made me pucker up and my mouth was watering like crazy, not to mention that this unusual technique perfectly suits the letter “e” on my recipe search list. And it’s lemon - I had to make it.

I found these bars delicious, insanely sour with little bits of lemon here and there making the texture a very interesting mix of smooth and chewy. They might be too much if you’re not into citrus and sour flavors like me, though – it’s a matter of taste. I am sure that some people will think that Alejandro González Iñárritu has lost his marbles after watching the teaser trailer for Birdman, but I personally found it beautiful beyond words and cannot wait to watch the whole movie.

It’s a matter of taste. :)

Lemon marmalade bars
slightly adapted from The Telegraph

Filling:
2 large lemons
1 cup (200g) granulated sugar
3 eggs
1 teaspoon vanilla extract
4 teaspoon corn starch
pinch of salt
45g unsalted butter, melted and cooled

Base:
1 cup (140g) all purpose flour
¼ cup (50g) granulated sugar
pinch of salt
90g unsalted butter, melted and cooled
½ teaspoon vanilla extract

Preheat the oven to 180°C/350°F. Lightly butter a 20cm (8in) square baking pan, line it with foil leaving an overhang in two opposite sides and butter the foil as well.

Filling: quarter one lemon lengthwise then slice each quarter into fairly small pieces, removing any seeds. Mix the lemon pieces with the sugar in a small bowl, rubbing the sugar into the lemon with your hands to help extract the lemon oil. Set aside for an hour at room temperature.
Base: in a medium bowl combine the flour, sugar, salt, melted butter and vanilla until a dough forms. Press it onto the base of the prepared pan and bake for 22-25 minutes or until golden.
While the base is cooking, finish preparing the lemon filling: juice the remaining lemon and measure out 3 tablespoons of juice; set aside. Using a food processor, blitz the macerated lemon-sugar mixture until smooth. Add the lemon juice, along with the eggs, vanilla, corn starch, salt and the melted butter. Purée again until the mixture is smooth.
Once the base is cooked, remove the pan from the oven and reduce the temperature to 150°C/300°F. Gently pour the lemon filling over the cooked crust and return the pan to the oven. Bake for about 20 minutes or until the mixture is barely set. The mixture will puff slightly in the middle and jiggle when you gently shake the pan.
Remove from the oven and allow to cool completely in the pan (refrigerating it for 1 hour makes cutting easier). Using the foil, lift from the pan and cut into squares.

Makes 16

Wednesday, June 11, 2014

Peanut butter and chocolate cake - much better than clay

Peanut butter and chocolate cake / Bolo de chocolate e manteiga de amendoim

Last week I tried to convince my sister to watch X-Men: Days of Future Past with me, but it was impossible: she wanted to go to the movies, yes, but to watch The Fault in Our Stars. Because I’m a softie when it comes to my sister, I said yes and then grabbed some extra paper napkins where we ate lunch, just in case. :D

The movie is lovely, Shailene Woodley and Ansel Elgort are adorable and good actors and the story is moving without being sentimentally poor – Shailene just needs to learn what feminism really is, the poor girl is completely mistaken about (apparently eating clay doesn’t do people’s brains any good). :)

I had several teary-eye moments, but did not cry my heart out as I did with The Tree of Life or The English Patient – I wonder if it was really because of the film or because I ate a couple of brigadeiros at the theater. Chocolate can really make you feel better, right? So if you plan on watching The Fault in Our Stars I suggest you pack some Kleenex and something chocolatey as well – a slice of this cake, which is made with cocoa and peanut butter and frosted with silky, delicious ganache can come in handy when the tears start rolling down your face, I promise you. :)

Peanut butter and chocolate cake
slightly adapted from the most beautiful cookbook I own (I bought mine here)

Cake:
½ cup (45g) Dutch-processed cocoa
½ cup (120ml) boiling water
300g all purpose flour
1 ½ teaspoons baking powder
pinch of salt
185g unsalted butter, softened
1 ½ cups (300g) granulated sugar
¼ cup smooth peanut butter
3 eggs
1 teaspoon vanilla extract
¾ cup (180ml) buttermilk*

Ganache:
¼ cup (60m) heavy cream
180g dark chocolate, finely chopped – I used one with 53% cocoa solids
1 tablespoon smooth peanut butter

Preheat the oven to 180°C/350°F. Butter a 23cm (9in) round cake pan, line the bottom with a circle of baking paper and butter the paper was well.
Stir cocoa and water in a small bowl until dissolved, then cool for 10 minutes.
In a medium bowl, whisk together the flour, baking powder and salt. Set aside.
Using an electric mixer, cream butter and sugar until light and fluffy. Beat in the peanut butter. Beat in eggs, one at a time, and scrape the sides of the bowl occasionally. Beat in the vanilla and the cocoa mixture. On low speed, beat n the dry ingredients in three additions, alternating with the buttermilk (start and end with the dry ingredients). Transfer to pan and bake for 55-60 minutes or until risen and a skewer inserted in the center of the cake comes out clean. Cool in the pan over a wire rack for 30 minutes, then carefully unmold, peel off the paper and transfer to the rack to cool completely.

Ganache: Heat cream over medium heat until almost boiling. Remove from the heat, add chocolate and peanut butter and set aside for 3 minutes. Stir until smooth, then refrigerate for 15 minutes or until slightly thicker. Spread over cooled cake.

* homemade buttermilk: to make 1 cup buttermilk place 1 tablespoon lemon juice in a 240ml-capacity measuring cup and complete with whole milk (room temperature). Wait 10 minutes for it to thicken slightly, then use the whole mixture in your recipe

Serves 8-10

Monday, June 9, 2014

Broccolini, bacon and quinoa fritters and Katey Sagal

Broccolini, bacon and quinoa fritters / Bolinhos de quinua, brócolis e bacon

One thing I don’t understand is why Sons of Anarchy hasn’t been showered with awards – it is an amazing show, with great writing and acting, the whole cast being so constantly perfect. There are shows with tons of awards that to me make no sense at all, like the ultra-boring Frasier (one that you already know I absolutely hate).

I was really curious about SoA’s third season because of Katey Sagal’s Golden Globe win, and by the end of it I had to agree that she kicked some serious ass, but to me she’s been doing that ever since the pilot – I don’t get the sole nomination, she should have gathered many more; an actress that gravitates from comedy to drama with such class and talent has all my respect.

Adding more grains to the meals I cook is one goal I’ll try to achieve, and Bill Granger’s quinoa fritters are a good way to do that: a bit of broccolini for iron and crispy bacon for flavor and something that was already good became even greater – just like Katey Sagal’s portrayal of Gemma Teller.

Broccolini, bacon and quinoa fritters
adapted from Bill Granger and Donna Hay magazine

100g quinoa
3 rashers of bacon
1 spring onion, thinly sliced
2 tablespoons chopped parsley
30g freshly grated parmesan
1 ½ tablespoons all purpose flour
salt and freshly ground black pepper
finely grated zest of ½ lemon
1 large egg
80 broccolini florets, steamed and finely chopped
canola oil, for frying

Place the quinoa and 200ml water in a small saucepan, cover and bring to a boil over high heat. Reduce the heat to low and simmer gently for about 12 minutes, or until the water has been absorbed and the quinoa is tender. Cool.
Heat a non-stick frying pan over high heat. Add the bacon and cook for 3–4 minutes or until golden. Drain in paper towels, then chop.
In a medium bowl, combine the quinoa, spring onion, parsley and parmesan. Add flour, salt and pepper, lemon zest and egg. Stir well to combine, then stir in the bacon and broccolini.
Heat a drizzle of oil in a large, nonstick frying pan over medium-high heat and 2 tablespoons of mixture per fritter (cook them in batches). Cook for 2-3 minutes each side, or until browned. Repeat with the remaining mixture.

Makes about 10


Friday, June 6, 2014

Lemon panna cotta with roasted strawberries - great for entertaining

Lemon panna cotta with roasted strawberries / Panna cotta de limão siciliano com morangos assados

I love having people over for dinner – feeding people fills me with joy, I could easily say it’s therapeutic. However, I usually get too anxious because I want to cook a fantastic meal, and I usually want to cook several different things, which is not a wise decision when entertaining unless you want to slave in the kitchen the whole time while your husband does the honors in the living room. :S

Since friends and family love my homemade pizza the main course has been a no-brainer lately, but when it comes to dessert I often have trouble making up my mind. I love warm desserts (like this absolutely divine citrus pudding or Bill Granger’s banana pudding), but with the pizzas in the oven I’ve been taking the made-ahead route, with things like mousses and pavlovas.

Panna cottas are another great idea and this one is no exception: you can make both the panna cotta and the roasted strawberries in advance and keep them in the fridge. This dessert has a light texture and is very refreshing – always a good thing after a lot of pizza and a lot of wine. :D

Lemon panna cotta with roasted strawberries
from Good Food magazine and Donna Hay magazine

Panna cotta:
2 ½ leaves of gelatin
600ml heavy/whipping cream
150ml whole milk
200g granulated sugar
finely grated zest and juice of 2 lemons
finely grated zest of 1 lime

roasted strawberries, made with 200g strawberries + ¼ cup (50g) granulated sugar

Panna cotta: Soak the gelatin leaves in a bowl of cold water and set aside.
Put the cream, milk and sugar into a large saucepan and cook over medium heat until it comes to a boil. When the cream is boiling, add the lemon juice and the lemon and lime zest and whisk well. Simmer for 3 minutes, stirring occasionally, then turn off the heat.
Scoop the softened gelatin out of the water and squeeze off any excess water. Stir into the hot cream, let cool to room temperature, then strain the cream into a jug. Carefully pour the mix into eight 120ml ramekins and refrigerate for at least 5 hours until completely set – overnight is ideal.

Before serving, top each panna cotta with the roasted strawberries.

Serves 8

Wednesday, June 4, 2014

Beef and mushroom cannelloni and things worth trying

Beef and mushroom cannelloni / Canelone de carne e cogumelo

When I look at this recipe I think of the phrase “when life gives you lemons, make lemonade”, but in a slightly different way: if your husband tried mushrooms for the first time and liked it, add them to your food every chance you get. :D

After the success I had with the vegetarian bolognese, I could not wait to cook with mushrooms again, and the inspiration came right from the first pages of this wonderful cookbook – I am the kind of person so crazy for mince that buys a cookbook on the subject. :)
After I finished cooking the filling, it smelled and tasted so good I felt like eating it with some bread, sloppy joe style, and it could have been tossed with some spaghetti, too, for a very quick meal (just some ideas if you’re not in the mood for rolling cannelloni).

For years my husband did not understand my love for TV series, and of course he wouldn’t because he had never given the shows a try. That changed when I got him to watch The Blacklist with me – he got hooked on Raymond Reddington’s adventures as much as I did, and he liked the show so much we now watch Resurrection together as well.

I guess that in life one should try things before knocking them, either if they’re food or TV shows – and this dish I bring you today is well worth trying.

Beef and mushroom cannelloni
adapted from the great Mincespiration!

tomato sauce, made with 1 ½ cans (400g each can) peeled chopped tomatoes (save the remaining ½ can for the filling), warm

olive oil
200g button mushrooms, wiped and chopped
salt and freshly ground black pepper
300g beef mince
1 onion, finely chopped
3 fat garlic cloves, crushed
80ml white wine
½ can peeled chopped tomatoes
handful fresh oregano leaves
500g fresh lasagna sheets
about 50g Parmesan cheese, finely grated

Preheat the oven to 200°C/400°F.
Heat 1 teaspoon olive oil in a large non-stick frying pan and fry the mushrooms until browned. Season with salt and pepper. Remove the mushrooms from the pan and set them aside. Using the same pan, add a little more oil and fry the beef for 4-5 minutes until browned. Add the onion and garlic and continue cooking for 2-3 minutes. Season with salt and pepper. Pour in the wine and cook until the liquid is reduced by half, then add the chopped tomatoes and the oregano and cook for 5 minutes, stirring occasionally. Put the mushrooms back in the pan and cook for 1 minute or until liquid is almost completely absorbed. Remove from the heat and cool slightly.

Spread half the tomato sauce on the bottom of a 20x30cm (8x12in) baking dish or pan.
Lay a sheet of lasagna on a board, spoon on some filling, top with a little parmesan and roll up, forming a cylinder. Repeat with the remaining pasta sheets and filling. Place the cannelloni in the baking dish on top of the tomato, the cover with the remaining sauce and sprinkle with the remaining parmesan. Bake for about 30 minutes or until bubbly and pasta is cooked.

Serves 5-6


Monday, June 2, 2014

Orange poppy seed financiers and a thing for weird projects

Orange poppy seed financiers / Financiers de laranja e semente de papoula

I told you, months ago, that I wasn’t in the mood to watch Nymphomaniac, but days ago I was so bored with the TV programming that I gave the movie a chance, only to be convinced, by the end of it, that Lars Von Trier is really not my cup of tea. There are some strikingly beautiful shots in the film, but I did not like it as a whole. It’s porn – and there’s nothing wrong with that – so I wish people wouldn't try to sell it as art.

The newcomer Stacy Martin got all the action in the first movie, but as for what I’ve read poor Charlotte Gainsbourg is in a pickle in volume II – I must say I find Charlotte a very courageous actress, for after what she went through in Antichrist I could have sworn she would never work with Lars Von Trier again (I certainly wouldn’t). But she did, and more than once.

While Charlotte seems to have a thing for weird projects, my "thing" is a lot simpler and tastier: financiers. They’re a favorite of mine and I make some whenever I have egg whites in my freezer – I’ve been trying to make an angel food cake for months, but financiers win every time. The orange zest gave these wonderful smell and flavor, while the poppy seeds made them pretty and added a bit of crunch.

Orange poppy seed financiers
adapted from the always delicious Simply Bill

85g almond meal (finely ground almonds)
135g icing sugar, sifted
55g all purpose flour, sifted
pinch of salt
1 ½ tablespoons poppy seeds
finely grated zest of 1 very large orange or 2 small ones
5 egg whites
95g unsalted butter, melted and cooled
1 teaspoon vanilla extract
icing sugar, for dusting

In a large bowl, combine the almond meal, icing sugar, flour, salt, poppy seeds and zest. Stir in the egg whites until just combined. Stir in the melted butter and the vanilla. Cover and refrigerate the batter for 1 hour.
Preheat the oven to 180°C/350°F. Butter and flour ten 100ml capacity mini cake or muffin pans.
Pour the batter in the pans. Bake for 15-20 minutes or until golden - the financiers should spring back when touched. Remove from the oven and leave in the pan for 2 minutes before turning out onto a wire rack to cool. Dust with icing sugar to serve.
Financiers are best served the day they’re made, but can be stored in an airtight container for up to 2 days.

Makes 10

Related Posts with Thumbnails